Parking Access Control System using Arduino
Introduction
In this project, I will create a Parking Access Control System using an RC522 RFID Module, an Arduino board, and an MG 996R Servo Motor. By using RFID Smart Cards or Key Fobs to authenticate people, we can limit access to the Servo Motor and only allow those with permission to open or close the Parking gate.
To keep things simple, we'll use a Servo Motor to simulate the opening and closing of a gate. However, if you're looking for a more professional installation while still keeping it DIY, you can use a Solenoid Door Lock or an electromagnetic door lock. If cost is a concern, I recommend using a Solenoid Door Lock.
When employees may have limited access to enter a location, utilize an item, or consume anything, access control is a crucial security measure. Verifying a person's credentials and allowing access to a resource is the process of authorization.
Electronics Access Control, sometimes known as EAC, is a straightforward idea that employs a computer system to get around the constraints of traditional lock and key systems. We offer three different forms of authentication in EAC. As follows:
· Putting a PIN or password into a keypad.
· Scan a keychain or smart card
· Utilize a biometric system, such as iris or fingerprints
In this easy do-it-yourself project, we'll use an RFID-based Parking access control system that uses smart cards and key fobs to authenticate people.
Working of Access Control System
An Access Control System is made up of different parts that work together to secure access to restricted areas. While the basic components required to create a functioning system are fairly consistent, each system can differ in complexity depending on its specific needs.
An Access Control System typically includes four main components:
· Controller: This is a small computer chip that can communicate with other parts of the system, like the Scanner/Reader module.
· Controlled Entry: This refers to the physical entry point that is being secured, such as a door or gate.
· Scanner/Reader: This is a device that accepts input from the user, like a password, fingerprint, or RFID card.
· Locking Mechanism: This is the mechanism that physically locks or unlocks the Controlled Entry point, such as a solenoid door lock or a motor-controlled door strike.

Fig. 1
Components Required
RC522 RFID Module
RFID Smart Card
RFID key Fob
16x2 LCD Display
Arduino Jumper Wires
MG996R Servo Motor
PCF8574 I2C LCD Module
As the official partner of Arduino, Utmel provides you with official original Arduino products. Welcome to shop at the Arduino product page.
Creating an Access Control System with Arduino and RC522 RFID Reader Module
To create this project, I selected the Arduino UNO microcontroller to act as the main brain of the system.
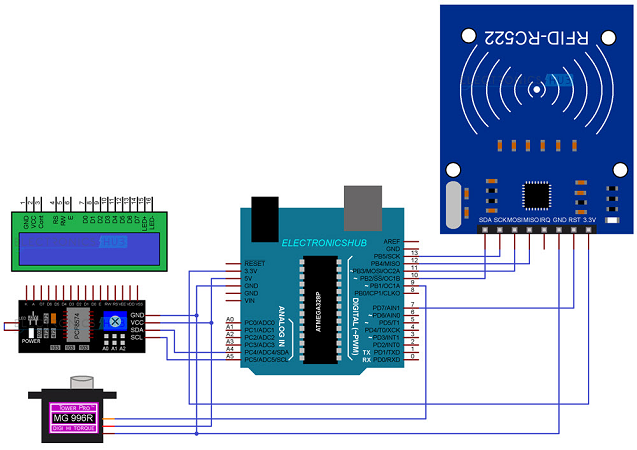
To allow users to interact with the system, we will use a device called the RC522 RFID Reader Module, which can read the data stored on RFID smart cards or key fobs that users will be given as their credentials.
We'll also use a 16x2 LCD Display and a PCF8574 I2C LCD Module to show relevant information to users, such as a welcome message or a user ID number.
The Arduino and RC522 RFID Module will be connected using a communication protocol called SPI Interface, while the connection between the Arduino and PCF8574 I2C LCD Module (and subsequently, the 16x2 LCD) will use a different communication protocol called I2C Interface.
If you are using the same powerful MG 996R Servo Motor that I used, you'll need to connect it to a PWM pin on the Arduino and provide it with an external power supply.
Hardware:

Fig. 2
Software Required:
· Arduino IDE
Install Libraries
Before you can start building an Access Control System with Arduino and RC522 RFID Reader Module, you need to make sure you have all the necessary software installed.
Specifically, you'll need to have a few different libraries installed in your Arduino Integrated Development Environment (IDE) so that your code can communicate properly with the hardware.
The required libraries for this project are SPI, MFRC522, Servo, and LiquidCrystal_I2C.
Luckily, two of these libraries (SPI and Servo) are already included in the Arduino IDE, so you just need to install the other two.
Unique ID of Master Card(s)
Once you've got all the necessary software installed for your Access Control System, the next step is to identify the specific RFID cards or key fobs that will have permission to access the gate (or other resource).
These "master" cards will have a unique ID number associated with them, called a UID (Unique ID). To get the UID numbers of the master cards, you can use a code example called "DumpInfo" that's included in the "MFRC522" library.
By running the "DumpInfo" code on each of the master cards, you can collect their unique ID numbers and make sure that only those cards (and not any unauthorized cards) will be able to trigger the gate to open
Slave Address for I2C LCD Module
If you're using an I2C LCD Module with a 16x2 display for your Access Control System, there's one more step you'll need to take before everything will work properly.
Specifically, you'll need to figure out the I2C address of the PCF8574 IC that's used to communicate with the LCD module.
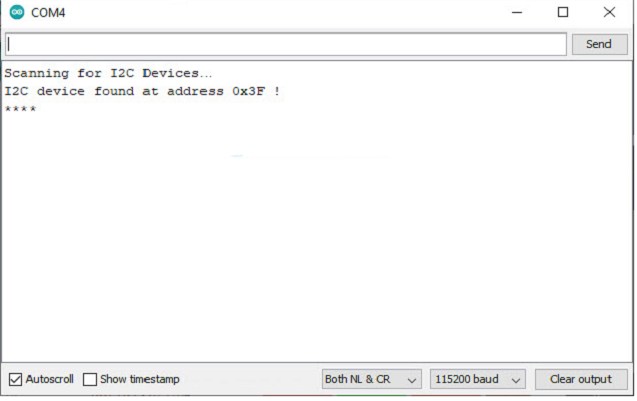
To do this, you'll need to connect just the PCF8574 I2C Module to your Arduino (using the I2C bus), and then run a short code snippet to retrieve the slave address.
Once you have this address, you can use it in your main code to make sure the Arduino can properly communicate with the LCD module and display the right information for users.
#include <Wire.h>
void setup()
{
Wire.begin();
Serial.begin(9600);
while (!Serial);
}
void loop()
{
byte error, address;
int I2CDevices;
Serial.println("Scanning for I2C Devices…");
I2CDevices = 0;
for (address = 1; address < 127; address++ )
{
Wire.beginTransmission(address);
error = Wire.endTransmission();
if (error == 0)
{
Serial.print("I2C device found at address 0x");
if (address < 16)
{
Serial.print("0");
}
Serial.print(address, HEX);
Serial.println(" !");
I2CDevices++;
}
else if (error == 4)
{
Serial.print("Unknown error at address 0x");
if (address < 16)
{
Serial.print("0");
}
Serial.println(address, HEX);
}
}
if (I2CDevices == 0)
{
Serial.println("No I2C devices found\n");
}
else
{
Serial.println("****\n");
}
delay(5000);

Fig. 3
Code
In order to run the Arduino RC522 RFID Module-based Parking Access Control System, we need to write a simple code. First, create a list of all the RFID card / key fob UIDs that are authorized to have access to the system. Then, use the RC522 RFID Module connected to the Arduino to scan an RFID card or key fob. If the scanned card's UID matches with one on the list of authorized cards, then the system will open the gate or door and display a welcome message on the 16x2 LCD Display. However, if the scanned card does not have permission, the gate will not open and the LCD display will show an access denied message.
#include <SPI.h>
#include <MFRC522.h>
#include <Servo.h>
#include <LiquidCrystal_I2C.h>
/*Using Hardware SPI of Arduino */
/*MOSI (11), MISO (12) and SCK (13) are fixed */
/*You can configure SS and RST Pins*/
#define SS_PIN 10 /* Slave Select Pin */
#define RST_PIN 7 /* Reset Pin */
#define SERVO_PIN 9 /* Servo Pin - Must be a PWM Pin */
/* Use 'DumpInfo' example in MFRC522 Library to get RFID Card's UID */
/* Replace the following with your RFID UID */
/* Do not put 0's */
/* In my case, UID is F3 9E 3D 03 */
/* So, I put F39E3D3, without any 0's and spaces */
String masterTagID = "F39E3D3";
/* Create a string to capture scanned card's UID */
String scanTagID = "";
/* Create an instance of Servo */
Servo myservo;
/* Create an instance of MFRC522 */
MFRC522 mfrc522(SS_PIN, RST_PIN);
/* Create an instance of LiquidCrystal_I2C */
/* LiquidCrystal_I2C lcd(Slave Address, # of Columns, # of Rows); */
LiquidCrystal_I2C lcd(0x3F, 16, 2);
/* Custom Character for Happy Face */
byte customCharGranted[] = {
B00000,
B00000,
B01010,
B00000,
B10001,
B01110,
B00000,
B00000
};
/* Custom Character for Frown Face */
byte customCharDenied[] = {
B00000,
B00000,
B01010,
B00000,
B00000,
B01110,
B10001,
B00000
};
void setup()
{
/* Initialize LCD */
lcd.init();
lcd.backlight();
/* Store Custom Characters into ROM of LCD */
lcd.createChar(0, customCharGranted);
lcd.createChar(1, customCharDenied);
lcd.setCursor(0,0);
lcd.print(" RC522 RFID ");
lcd.setCursor(0,1);
lcd.print(" Access Control ");
/* Initialize Servo */
myservo.attach(SERVO_PIN);
/* Set initial position of Servo */
/* In this position, the gate is closed */
myservo.write(90);
/* Initialize SPI Bus */
SPI.begin();
/* Initialize MFRC522 Module */
mfrc522.PCD_Init();
delay(2000);
lcd.clear();
lcd.setCursor(0, 0);
lcd.print("*Scan Your Card*");
}
void loop()
{
while (readTagID())
{
lcd.clear();
lcd.setCursor(0, 0);
if (scanTagID == masterTagID)
{
lcd.print("Access Granted ");
lcd.write(0);
lcd.setCursor(0, 1);
lcd.print("Welcome: ");
lcd.print(scanTagID);
/* Open the gate */
myservo.write(20);
}
else
{
lcd.print("Access Denied ");
lcd.write(1);
lcd.setCursor(0, 1);
lcd.print("Get Out: ");
lcd.print(scanTagID);
//myservo.write(90);
}
delay(3000);
/* Close the gate after a delay of 3s */
myservo.write(90);
lcd.clear();
lcd.setCursor(0, 0);
lcd.print("*Scan Your Card*");
}
}
boolean readTagID()
{
if ( ! mfrc522.PICC_IsNewCardPresent())
{
return false;
}
if ( ! mfrc522.PICC_ReadCardSerial())
{
return false;
}
/* Clear the string */
scanTagID = "";
for ( uint8_t i = 0; i < 4; i++)
{
scanTagID += String(mfrc522.uid.uidByte[i], HEX);
}
scanTagID.toUpperCase();
mfrc522.PICC_HaltA();
return true;
}
Project Explanation
After the introductory messages are displayed on the LCD, the Arduino will display the message 'Scan Your Card' and is now ready to read or scan the RFID cards or key fobs. In this project, only the RFID smart card is programmed as the master card, which means only it has access while the key fob doesn't.
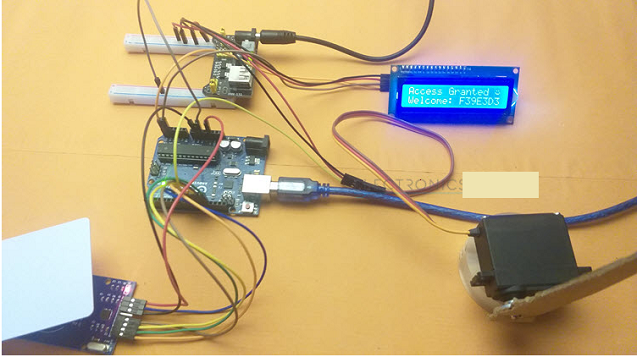
When the RFID smart card is scanned, the Servo motor will activate and represent the opening of a gate or unlocking of a parking door.

Fig. 4
The LCD screen will show a message saying 'Access Granted', along with the Unique ID (UID) of the card that was scanned.

Fig. 5
If I scan the key fob, the Servo will stay locked because it's not set as a master card.

Fig. 6
An ‘Access Denied’ message will be appeared on the LCD.
Fig. 7
Here is how you can make your Project for Car Parking System

Fig. 8
Conclusion
This project demonstrates a simple Parking Access Control System that uses an Arduino, RC522 RFID Module, MG 996R Servo, PCF8574 I2C LCD, and a few RFID smart cards and key fobs. You have learned about the key components needed for this project and how to implement the Arduino RC522 RFID Module based Parking Access Control System in a simple way.
 IOT-Based Anti-theft HandbagUTMEL29 August 20235519
Hello everyone, welcome to the new post today. We will discuss all the security features of our Anti-theft handbag in this post.
Read More How to make an Obstacle Avoiding Robot?UTMEL29 August 20239964
The article will tell you How to make an Obstacle Avoiding Robot.
Read More Arduino and Bluetooth Based Home AutomationUTMEL29 August 20235909
Hello everyone, welcome to the new post today.
Read More Arduino Based Gas Leakage DetectionUTMEL29 August 20237224
A gas detector is a safety device that identifies the presence of gases in a particular location. It is often part of a safety system and can detect gas leaks and other emissions.
Read More Parking Access Control System using ArduinoUTMEL29 August 20234291
Hello everyone, welcome to the new post today. In this project, we will create Parking Access Control System using an RC522 RFID Module, an Arduino board, and an MG 996R Servo Motor.
Read More
Subscribe to Utmel !
![SRN5040-220M]() SRN5040-220M
SRN5040-220MBourns Inc.
![AFBR-2418TZ]() AFBR-2418TZ
AFBR-2418TZBroadcom Limited
![SRN4018TA-2R2M]() SRN4018TA-2R2M
SRN4018TA-2R2MBourns Inc.
![SFH 4713A]() SFH 4713A
SFH 4713AOSRAM Opto Semiconductors Inc.
![LMK212AB7106KG-T]() LMK212AB7106KG-T
LMK212AB7106KG-TTaiyo Yuden
![PMR01ZZPJU10L]() PMR01ZZPJU10L
PMR01ZZPJU10LROHM Semiconductor
![TZY2Z060AC01R00]() TZY2Z060AC01R00
TZY2Z060AC01R00Murata Electronics
![RMCF2512FT33R0]() RMCF2512FT33R0
RMCF2512FT33R0Stackpole Electronics Inc
![SML-S13RTT86]() SML-S13RTT86
SML-S13RTT86ROHM Semiconductor
![TZY2Z100AC01R00]() TZY2Z100AC01R00
TZY2Z100AC01R00Murata Electronics


