Product
 Brand
Brand Articles
 Tools
Tools
VFD Driving Guide: What to Do When Your MCU Runs Out of Pins?
Understanding VFD Technology: The Foundation
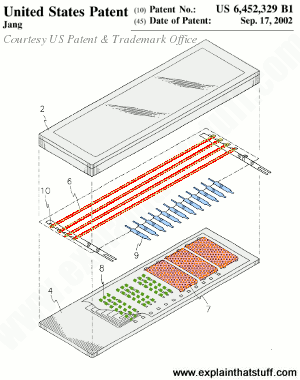
VFD Core Components
Filament (Cathode): 1-2V AC heated wire
Anodes: Phosphor-coated segments
Grid: Control electrodes (optional)
Vacuum Chamber: Sealed glass envelope
Vacuum Fluorescent Displays operate on the principle of thermionic emission. When the filament is heated, it emits electrons that are attracted to the positively charged anodes. The phosphor coating on the anodes glows when struck by these electrons, creating the characteristic blue-green light that makes VFDs so distinctive.
💡 Key Insight: Why VFDs Need So Many Pins
A typical 4-digit, 7-segment VFD requires control over 28 individual segments plus filament connections. Add decimal points and you're looking at 32+ connections. Most microcontrollers simply don't have enough I/O pins for direct control!
The Pin Shortage Problem: Real-World Challenge
"I found this beautiful VFD and I wanna use it on a project, tho, how do I drive it if there are more segments than pins?"
— Reddit r/AskElectronics
This question, posted on Reddit's r/AskElectronics community, perfectly encapsulates a common challenge faced by electronics enthusiasts and professionals alike. When working with Vacuum Fluorescent Displays (VFDs), the seemingly simple task of lighting up a few digits quickly becomes a complex puzzle of pin management and power requirements.
Case Study: Reddit Community Response
When Reddit user Far-Orchid-1041 encountered this exact problem, the community response was swift and informative. User lmarcantonio provided the crucial insight:
"Usually they are multiplexed, probably one common for each digit and all the segment in parallel. Be careful that VFD have a really strange power supply and driving method, look around before experimenting with it."
This response highlights two critical aspects: the solution (multiplexing) and the warning about power requirements.
Direct driving a VFD means dedicating one microcontroller pin to each segment. For a simple 4-digit display, this approach would consume most of an Arduino's digital pins, leaving little room for other project components. This is clearly unsustainable for complex projects.
Multiplexing: The Core Solution
Multiplexing (also known as dynamic scanning) is the elegant solution to the pin shortage problem. Instead of controlling each segment individually, multiplexing allows you to control entire digits sequentially at high speed, creating the illusion that all digits are lit simultaneously.
How VFD Multiplexing Works

Digit Selection: Activate one digit at a time
Segment Control: Set segment patterns for active digit
Rapid Switching: Cycle through all digits at 100+ Hz
Persistence of Vision: Human eye perceives continuous display
| Method | Pins Required | Advantages | Disadvantages |
|---|---|---|---|
| Direct Drive | 28+ pins | Simple software, max brightness | Excessive pin usage |
| Multiplexing | 11 pins | Minimal pins, scalable | Complex timing, reduced brightness |
Critical Timing Considerations
VFD multiplexing requires precise timing. Too slow, and you'll see flickering. Too fast, and the display may appear dim. The sweet spot is typically between 100-200 Hz refresh rate for optimal visual performance.
Practical Implementation Solutions
Solution 1: Shift Registers (74HC595)
The 74HC595 shift register is a popular choice for expanding I/O capabilities. This 8-bit serial-to-parallel converter allows you to control 8 outputs using just 3 microcontroller pins.
74HC595 Specifications
3-wire SPI interface
8 parallel outputs
Cascadable design
5V operation

Solution 2: Dedicated VFD Driver ICs
Professional applications often employ specialized driver chips designed specifically for VFD control. These ICs handle both the logic and high-voltage requirements of VFD operation.
MAX6921/MAX6931
20-output driver
76V capability
SPI interface
Built-in multiplexing
HV5812
20-channel serial input
80V operation
CMOS shift register
Data latches included
These specialized chips, available from suppliers like Utmel Electronics, significantly simplify VFD integration by handling both the multiplexing logic and high-voltage switching internally.
Power Supply Considerations

As Reddit user nixiebunny explained in the community discussion:
"The filament needs about 1-2V AC. The segment grids can be controlled with 5V CMOS signals, and the anodes (digits) need about 25VDC controlled by PNP transistors."
VFD Power Requirements
Filament
• 1-2V AC
• ~100mA current
• 100Hz switching
Grid/Segments
• 5V CMOS logic
• Low current
• Fast switching
Anodes
• 20-30V DC
• PNP transistor drive
• Multiplexed control
Critical Design Questions
🤔 How do you balance refresh rate with power consumption?
Higher refresh rates eliminate flicker but increase power consumption. Consider your application's power budget and user experience requirements.
🤔 Should you choose shift registers or dedicated driver ICs?
Shift registers offer flexibility and lower cost, while dedicated ICs provide integrated solutions with better performance and reliability.
🤔 How do you handle the AC filament requirement in battery-powered projects?
Consider H-bridge circuits for AC generation or center-tapped supplies with current limiting resistors for balanced DC operation.
🤔 What's the optimal duty cycle for multiplexed operation?
Typical duty cycles range from 20-25% (4-5 digits) to maintain adequate brightness while preventing cathode poisoning.
Performance Optimization Tips
🚀 Software Optimization
Use timer interrupts for consistent timing
Implement lookup tables for segment patterns
Buffer display data to minimize glitches
Consider blanking between digit switches
⚡ Hardware Optimization
Use low-ESR capacitors for power filtering
Implement proper ground planes
Add current limiting for filament protection
Consider thermal management for driver ICs
Conclusion: Mastering VFD Control

The Reddit community's response to Far-Orchid-1041's VFD driving question demonstrates the collaborative nature of electronics problem-solving. What started as a simple question about pin limitations evolved into a comprehensive discussion covering multiplexing techniques, power supply requirements, and practical implementation strategies.
Key takeaways from this analysis:
Multiplexing is essential for practical VFD control with limited microcontroller resources
Power supply design is critical and often overlooked by beginners
Specialized driver ICs simplify implementation but shift registers offer flexibility
Timing precision directly affects display quality and user experience
Community knowledge accelerates learning and prevents costly mistakes
Final Thoughts
Whether you're building a retro-styled clock, an instrument display, or a decorative art piece, understanding VFD multiplexing principles opens up possibilities that seemed impossible with direct pin control. The techniques discussed here, validated by community experience and professional practice, provide a solid foundation for any VFD project.
Remember: Start simple, test thoroughly, and don't hesitate to engage with communities like Reddit's r/AskElectronics when facing challenges. The collective knowledge of experienced engineers can save weeks of trial and error.
📚 Additional Resources
 UTMEL
UTMEL
We are the professional distributor of electronic components, providing a large variety of products to save you a lot of time, effort, and cost with our efficient self-customized service. careful order preparation fast delivery service
Why can't I just use DC voltage for the VFD filament?
DC voltage will cause uneven heating across the filament due to resistance variations, leading to one end being brighter than the other. AC voltage ensures uniform illumination. However, you can use a center-tapped DC supply with current limiting resistors as an alternative.
How many digits can I multiplex before brightness becomes an issue?
Most VFD designs can successfully multiplex 4-6 digits. Beyond this, brightness reduction becomes noticeable. The duty cycle for each digit decreases proportionally with the number of digits, so 8 digits would have only 12.5% duty cycle per digit.
What's the minimum refresh rate to avoid visible flickering?
The minimum refresh rate is typically 50-60 Hz to avoid visible flickering under normal lighting conditions. However, 100+ Hz is recommended for applications where the display might be viewed under bright lights or captured on camera.
Can I use standard logic gates instead of specialized driver ICs?
Yes, you can use combinations of shift registers, logic gates, and high-voltage transistors. However, specialized driver ICs integrate these functions with optimized timing, better EMI performance, and built-in protection features, making them preferable for professional designs.
How do I determine the pinout of an unknown VFD?
Start by identifying the filament pins (usually the lowest resistance between two pins). Then systematically test combinations of pins with appropriate voltages.
 Getting Started with Arduino: What is Arduino and How to Use Arduino BoardsUTMEL28 September 20236906
Arduino is an open-source electronics platform that includes software and programmable circuit boards, allowing beginners to build electronic projects by writing simple code. The article provides an overview of Arduino, including different board types, basic components, how to use the boards, and project ideas like an automated plant watering system.
Read More Arduino vs. Raspberry Pi: A Detailed ComparisonUTMEL24 April 20255570
Hello everyone, welcome to the new post today.This guide is going to talk in detail about Arduino vs. Raspberry Pi to clarify their differences and help you pick the right board based on your needs.
Read More Electronic Components in the Smart Home SystemUTMEL24 April 20252885
Electronic parts are the heart of every smart home system. These parts help devices talk, do tasks, and save energy. For instance, sensors notice motion or temperature changes. Microcontrollers use this data to do things like dim lights or turn on alarms.
Read More Software Tools for NXP Microcontroller DevelopmentUTMEL06 June 20251820
Discover how NXP microcontroller tools like MCUXpresso IDE, SDK, and Config Tools streamline coding, debugging, and hardware setup for embedded systems.
Read More VFD Driving Guide: What to Do When Your MCU Runs Out of Pins?UTMEL22 July 20251436
This comprehensive guide addresses a common challenge faced by electronics enthusiasts: driving Vacuum Fluorescent Displays (VFDs) when microcontrollers have insufficient pins. Sparked by a Reddit user's question about controlling a VFD with more segments than available MCU pins, the article explores the elegant solution of multiplexing technology.
Read More
Subscribe to Utmel !
![SFSD008GN1AM1TO-I-5E-22P-STD]() SFSD008GN1AM1TO-I-5E-22P-STD
SFSD008GN1AM1TO-I-5E-22P-STDSwissbit
![SFSD004GL2AM1TO-I-5E-22P-STD]() SFSD004GL2AM1TO-I-5E-22P-STD
SFSD004GL2AM1TO-I-5E-22P-STDSwissbit
![SFCA010GH1AO1TO-I-5S-21P-STD]() SFCA010GH1AO1TO-I-5S-21P-STD
SFCA010GH1AO1TO-I-5S-21P-STDSwissbit
![SFSD128GL2AM1TO-I-7G-221-STD]() SFSD128GL2AM1TO-I-7G-221-STD
SFSD128GL2AM1TO-I-7G-221-STDSwissbit
![SFCA160GH1AO2TO-I-8C-21P-STD]() SFCA160GH1AO2TO-I-8C-21P-STD
SFCA160GH1AO2TO-I-8C-21P-STDSwissbit
![SFSD128GL2AM1TO-E-7G-221-STD]() SFSD128GL2AM1TO-E-7G-221-STD
SFSD128GL2AM1TO-E-7G-221-STDSwissbit
![MTA4ATF51264AZ-3G2R1]() MTA4ATF51264AZ-3G2R1
MTA4ATF51264AZ-3G2R1Micron Technology Inc.
![SFSD004GN1AM1TO-I-5E-22P-STD]() SFSD004GN1AM1TO-I-5E-22P-STD
SFSD004GN1AM1TO-I-5E-22P-STDSwissbit
![SFSD256GL2AM1TO-I-8H-221-STD]() SFSD256GL2AM1TO-I-8H-221-STD
SFSD256GL2AM1TO-I-8H-221-STDSwissbit
![SFSD128GN1AM1TO-I-7G-221-STD]() SFSD128GN1AM1TO-I-7G-221-STD
SFSD128GN1AM1TO-I-7G-221-STDSwissbit