

 Product
 Brand
Brand Articles
 Tools
Tools
What Is a Decoupling Capacitor? Function, Placement, and Selection Guide
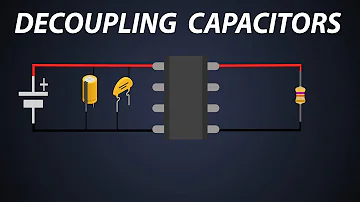
What are the Decoupling capacitors?
A decoupling capacitor is one of the smallest parts on a board and one of the easiest to get wrong. It rarely appears in a schematic discussion, yet a poorly chosen or poorly placed one is behind a surprising share of mysterious resets, flaky high-speed links, and radiated-emissions headaches. This guide skips the dictionary opening and goes straight to what these capacitors actually do, why their position on the board matters as much as their value, and how to reason about selection instead of copying a single number onto every power pin.
What a Decoupling Capacitor Does
A digital chip does not draw current smoothly. Every time its internal logic switches, it asks for a sharp burst of charge over a few nanoseconds, then goes quiet again. The voltage regulator that feeds the chip cannot answer that fast. It sits at the other end of traces, planes, and connectors, and the inductance of that path means it responds to load changes in microseconds, not nanoseconds. Left on its own, the chip's supply voltage would sag every time it switched and overshoot when it stopped.
A decoupling capacitor solves this by acting as a small, local charge reservoir parked right next to the chip. When the logic switches, the capacitor supplies the immediate current burst from charge it already holds, and the slower regulator quietly tops the capacitor back up between events. In effect, the capacitor handles the fast transients while the regulator handles the steady-state average.
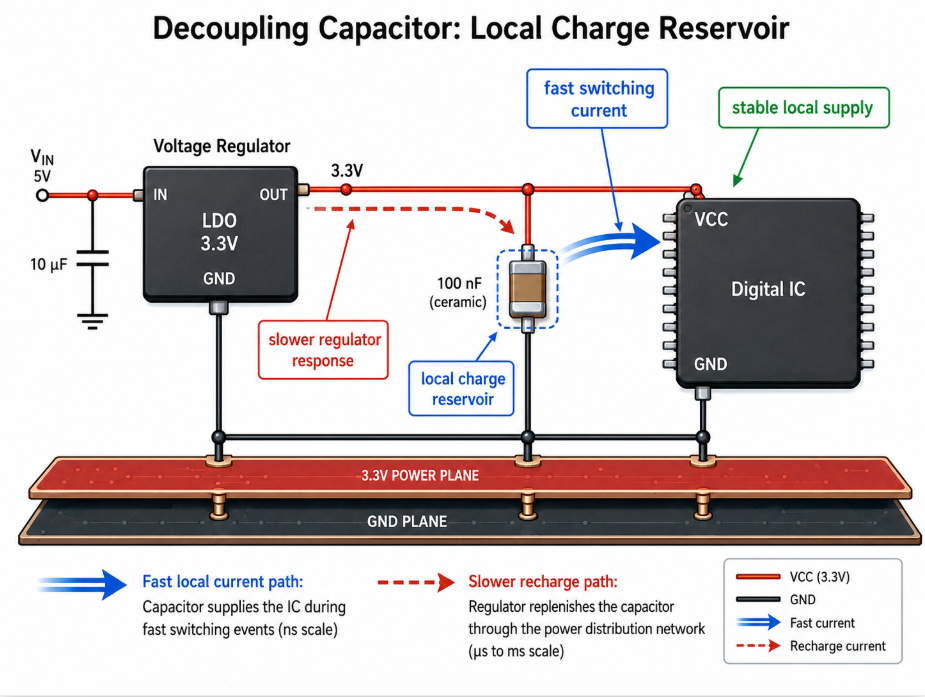
A decoupling capacitor supplies the chip’s fastest current bursts locally, while the regulator replenishes it over a slower time scale.
The same component also gives high-frequency noise an easy path to ground. Switching activity injects ripple and spikes onto the power rail. A capacitor presents a low impedance to those high-frequency components, so noise that would otherwise travel along the rail and couple into sensitive circuits is shunted to the ground reference instead. These two behaviours, fast charge delivery and noise shunting, are two sides of the same low-impedance role, which is why one part does both jobs at once.
The key mental model is impedance, not capacitance. A chip and its surrounding capacitors form a power distribution network, and what the chip "sees" is the impedance of that network across frequency. The goal of decoupling is to keep that impedance low across the whole band of frequencies the chip cares about. That framing explains why layout matters so much: the parasitic inductance of the connection can dominate a capacitor's behaviour at exactly the frequencies where you need it most.
Decoupling vs Bypass: Same Component, Two Roles
Newcomers often treat "decoupling capacitor" and "bypass capacitor" as two different parts, and the terms are used loosely enough in datasheets and forums that the confusion is understandable. In practice they almost always describe the same physical component doing closely related jobs.
When the emphasis is on supplying transient current and keeping a chip's local supply stable, the term "decoupling" fits because the capacitor decouples the chip's fast demands from the rest of the power network. When the emphasis is on diverting unwanted high-frequency noise away from a rail and into ground, "bypass" fits because the capacitor bypasses the noise around the load. The capacitor sitting on a power pin is doing both at the same time, so arguing over which label is correct is rarely productive. The useful distinction is functional, not a different bill-of-materials line.
| Aspect | "Decoupling" emphasis | "Bypass" emphasis |
|---|---|---|
| Primary intent described | Stabilise a chip's local supply during fast load changes | Divert high-frequency noise to the ground reference |
| Frame of reference | The chip as a fluctuating current sink | The rail as a carrier of unwanted noise |
| Typical placement language | Close to power/ground pins of a specific device | Across a supply rail near where noise enters or exits |
| Underlying component | Usually the same capacitor | Usually the same capacitor |
There are edge cases, such as a dedicated capacitor placed only to shunt a specific noise frequency, where one role clearly dominates. For everyday board design, though, treating decoupling and bypass as roles of one component keeps the reasoning clean.
Placement and Loop Inductance
If there is one idea that separates working decoupling from decoration, it is loop inductance. A capacitor only behaves like a capacitor up to its self-resonant frequency. Above that point, the parasitic inductance of the part and, more importantly, the inductance of the copper connecting it dominate, and the impedance starts rising again. Every extra millimetre of trace, every via, and every detour the current loop takes adds inductance that erodes the capacitor's usefulness at high frequency.
That is why placement is not a cosmetic decision. The current loop runs from the capacitor, into the chip's power pin, through the chip, out the ground pin, and back to the capacitor. The smaller you make the area of that loop, the lower its inductance, and the more effective the capacitor remains at the frequencies that matter. Power and ground planes help enormously here because they provide a wide, low-inductance return path and let the capacitor connect to the chip through short vias rather than long traces.
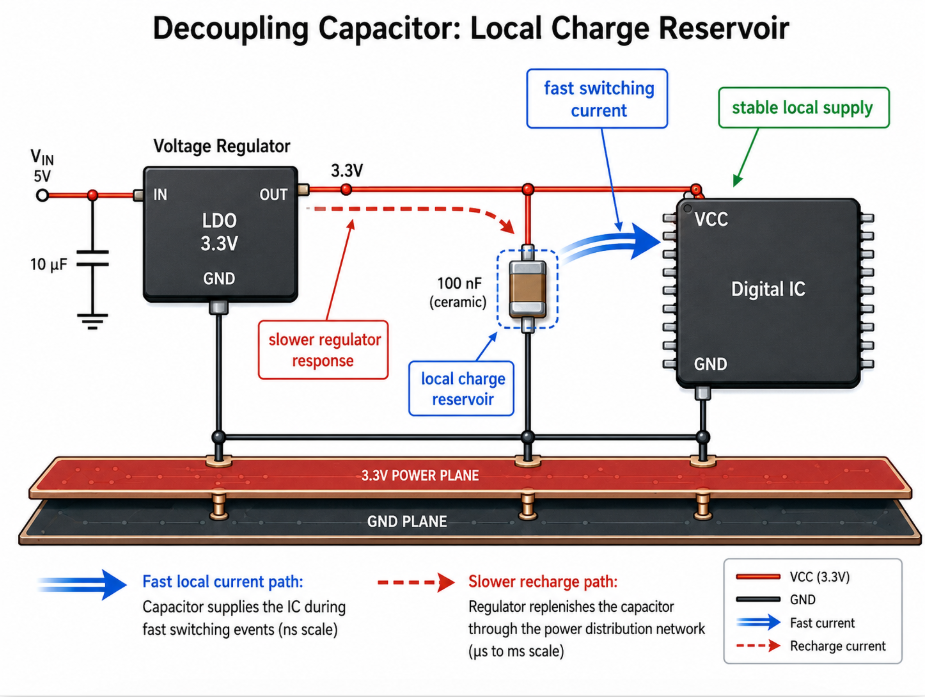
At high frequency, the capacitor’s layout can matter as much as its value because long traces and large loops add inductance.
A few practical habits keep loop inductance under control:
Put the high-frequency capacitor as close to the power and ground pins as the package and assembly process allow, on the same side as the chip when possible.
Connect each capacitor pad to the plane with its own short, fat via rather than sharing a long stub between several parts.
Keep the via-to-pad connection tight so the capacitor's return current does not have to travel across the board to find ground.
Place bulk capacitance nearby but not on top of the chip; it answers slower demands and does not need pin-adjacent positioning.
Leave enough clearance for the assembler to actually place and inspect the part, so a layout that is electrically ideal is still buildable.
When several capacitors share a rail, think about where each one's loop closes. A capacitor that is electrically far from the pin it is meant to support is contributing far less than its value suggests, no matter how good that value looks on paper.
Choosing a Value
There is no single magic capacitance, and the popular habit of dropping one identical part on every pin is a simplification that often underperforms. A robust supply stays low-impedance across a wide frequency range, and no single capacitor can do that alone. Larger capacitors hold more charge but become inductive at lower frequencies; smaller capacitors stay effective higher up but store little energy. Real designs therefore combine roles so that as one capacitor runs out of usefulness, the next takes over.
It helps to think in terms of bands rather than a list of parts. Bulk capacitance covers slow, large current swings and keeps the rail steady over longer time scales. Mid-band capacitance bridges the gap between the bulk reservoir and the fast local parts. High-frequency decoupling, placed right at the pins, handles the fastest transients. The exact capacitance, voltage rating, and package for each role depend on the specific device and rail, and those numbers belong in the relevant chip and capacitor datasheets rather than in a one-size guideline. Use the manufacturer's recommended decoupling network as your starting point and adjust from measurement.
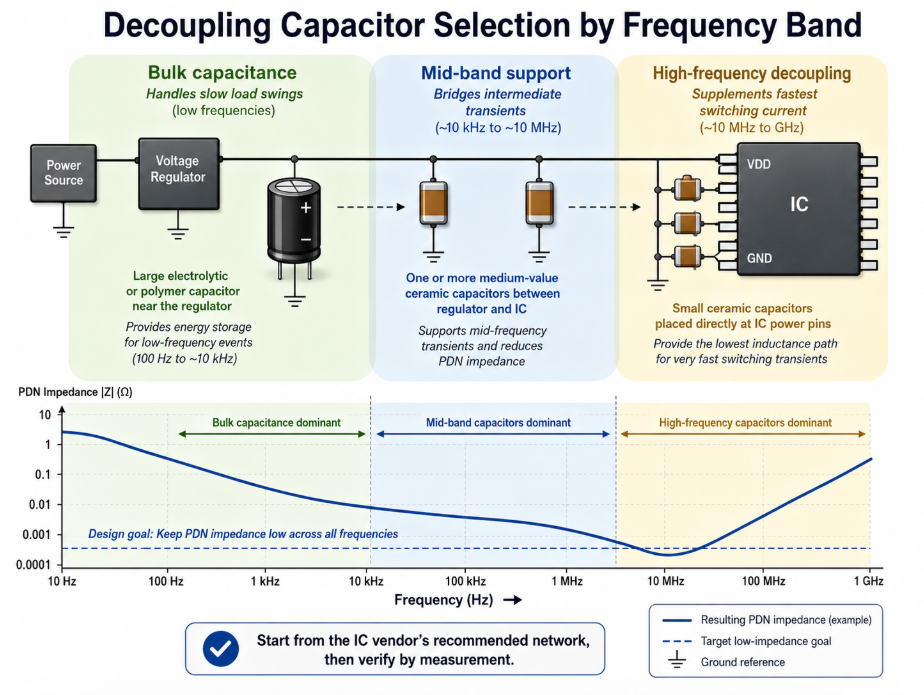
Decoupling is usually a network, not one magic value: different capacitor roles cover different transient frequency ranges.
| Role on the rail | What it handles | Where it sits | How to pin down the value |
|---|---|---|---|
| Bulk reservoir | Slow, large load swings and regulator hand-off | Near the supply entry or regulator output for the rail | Follow the regulator and device datasheet guidance for the rail's average and transient load |
| Mid-band support | Transients between bulk and pin-level events | Between the bulk part and the chip | Size from the device's power-integrity notes; verify against the network impedance target the chip vendor states |
| High-frequency decoupling | The fastest switching transients and noise | Immediately at the chip power/ground pins | Take the chip vendor's recommended per-pin value as the baseline, then confirm with measurement |
| Specialised filtering | A specific known noise frequency | At the source or victim of that noise | Defer to the application note covering that interface or converter |
A single small capacitor at the pin is sometimes genuinely enough, for example on a slow, low-pin-count part with modest current. It stops being enough as switching gets faster, current demand rises, or the rail feeds noise-sensitive analog circuitry. Rather than memorising a universal number, decide which bands your chip actually exercises and cover those, then trust the device datasheet for the specific figures.
Common Mistakes
Most decoupling problems are not exotic. They come from a handful of habits that look reasonable but break down once frequency and inductance enter the picture.
Relying on one universal value for everything. A single repeated part leaves gaps in the impedance curve and assumes every chip on the board has the same needs, which is rarely true.
Ignoring mounting inductance. A great capacitor on a long trace with a shared via behaves like a much worse part at high frequency, because the connection, not the capacitor, sets the impedance there.
Naive paralleling. Stacking many identical capacitors can create an impedance peak between their resonances where the network is worse than with fewer, better-chosen parts. More capacitors are not automatically better.
Treating the value as the whole story. Two boards with identical bills of materials can perform very differently if one has tight loops and the other has sprawling connections.
Designing a layout that cannot be built. Capacitors crammed where a placement machine cannot reach, or with no inspection clearance, get assembled poorly or not at all, which is an integrity problem disguised as a manufacturing one.
| Mistake | Why it bites | Better habit |
|---|---|---|
| One value on every pin | Leaves frequency gaps and over/under-serves different chips | Match the capacitor set to each chip's frequency bands |
| Long traces or shared vias | Mounting inductance dominates at high frequency | Short, dedicated vias close to the pins |
| Parallel many identical parts | Anti-resonant impedance peaks between resonances | Use a deliberate spread of values, verified by analysis |
| Value-only thinking | Loop area changes real performance | Treat layout and value as one decision |
| Unbuildable placement | Parts placed poorly or skipped in assembly | Respect placement and inspection clearances |
Quick Selection Checklist
When you reach the decoupling stage of a design, a short pass through these questions catches most issues before the board is fabricated:
Have you started from the chip vendor's recommended decoupling network for each major device rather than a generic rule?
Does each fast device have high-frequency decoupling right at its power and ground pins, with the shortest practical loop?
Is there appropriate bulk capacitance for each rail to handle slower, larger swings?
Are capacitor connections made with short, dedicated vias into solid power and ground planes?
Have you avoided stacking many identical parts where a spread of values would behave better?
Did you leave the specific capacitance, voltage, and package choices to the relevant datasheets and confirm them against the device's power-integrity guidance?
Can every capacitor actually be placed and inspected on the assembly line?
Frequently Asked Questions
Does every IC really need a decoupling capacitor?
Almost every active device benefits from local decoupling, and fast or noise-sensitive chips need it badly. A slow, low-current part might survive without one on a forgiving board, but adding local decoupling is cheap insurance against transient-related glitches, so the safe default is to provide it and let the device datasheet tell you how much.
Where exactly should the capacitor go?
As close to the chip's power and ground pins as the package and assembly allow, with the smallest possible current loop back through the planes. Electrical distance matters more than the number printed on the part, so a nearer capacitor of a sensible value usually beats a larger one placed far away.
What value should I use?
There is no universal answer, which is the honest version of the question. Start from the chip vendor's recommended network, cover the frequency bands your device actually exercises with a spread of bulk and high-frequency parts, and take the exact capacitance, voltage, and package from the relevant datasheets rather than from a single rule of thumb.
Is there a simple rule of thumb?
A common starting habit is one small high-frequency capacitor at each power pin plus bulk capacitance per rail, but treat that as a starting point, not a final answer. It can be too little for fast, high-current devices and unnecessarily uniform for a mixed board, so confirm against the device's power-integrity documentation.
What is the difference between decoupling and bypass capacitors?
They usually describe two roles of the same component. "Decoupling" stresses supplying local transient current and stabilising the supply, while "bypass" stresses diverting high-frequency noise to ground. A capacitor on a power pin generally does both, so the labels reflect emphasis rather than different parts.
Why does my decoupling seem ineffective even with the right value?
The most common culprit is the connection, not the capacitor. Long traces, shared vias, or a large current loop add inductance that dominates at high frequency and cancels much of the benefit. Tightening the layout often helps more than swapping in a different capacitance.
Can I just add more capacitors to be safe?
Not blindly. Adding many identical capacitors can create impedance peaks between their resonant frequencies, leaving the network worse off in that band. A deliberate spread of values, placed and connected well, beats a pile of identical parts.
Sources and References
Texas Instruments has a body of application notes on power-supply decoupling and PDN design, such as its bypass capacitor selection material, which is useful for understanding how a chip maker frames local decoupling for its own devices; because the guidance is tied to specific TI parts, treat the exact figures as device-bound rather than universal.
Analog Devices publishes decoupling and grounding guidance aimed at mixed-signal and precision designs, helpful for understanding why noise-sensitive rails need particular care; its emphasis on analog performance means some advice is stricter than a purely digital board requires.
Murata's capacitor technical resources explain self-resonance and impedance-versus-frequency behaviour from a component maker's view, which clarifies why small capacitors stop helping above a certain frequency; the material is naturally oriented toward Murata's own product lines.
TDK provides capacitor application and characteristics documentation that reinforces the impedance and mounting-inductance concepts behind placement; like any vendor source, the specifics describe its catalogue rather than every part on the market.
KEMET, now part of Knowles, offers capacitor selection and simulation tools and notes that are good for seeing how role-based selection works in practice; the modelled numbers apply to the parts in their library and should be confirmed for your actual components.
Vishay's capacitor product and application documentation is a further manufacturer reference for matching a capacitor's construction to its job; as with other vendors, the figures are part-specific datasheet data, not general rules.
Altium's PDN and decoupling design articles translate the theory into board-layout practice, which is useful for the loop-inductance and via guidance; being EDA-focused, they assume you will still pull exact values from device datasheets.
Sierra Circuits offers layout and power-integrity resources from a fabricator's perspective, helpful for understanding manufacturability and placement constraints; its advice reflects typical fabrication and assembly practice rather than one fixed standard.
PCBWay's design knowledge base provides accessible board-layout background for the placement principles discussed here; as a general fabricator resource it is best treated as orientation, with technical specifics verified against manufacturer documentation.
 UTMEL
UTMEL
We are the professional distributor of electronic components, providing a large variety of products to save you a lot of time, effort, and cost with our efficient self-customized service. careful order preparation fast delivery service
 AI Server MLCCs: Why NVIDIA Rubin Racks Require Over 600,000 CapacitorsUTMEL02 June 20263343
Next-generation AI servers like NVIDIA's Rubin architecture require over 600,000 MLCCs per rack due to extreme power densities exceeding 120kW. This transition from GB300 demands high-capacitance, low-ESR capacitors with X7R/X7S dielectrics to handle intense transient responses and thermal loads, forcing procurement teams to navigate extended 24-week lead times for these specialized components.
Read More MLCC vs Polymer Tantalum Capacitors: Overcoming 2026 Shortages in AI Server PDNsUTMEL07 August 2026641
Facing 2026 MLCC lead times of up to 24 weeks driven by AI server demand, hardware engineers are substituting multi-layer ceramic capacitors with conductive polymer tantalum capacitors. While Class II MLCCs suffer severe DC bias capacitance loss and acoustic noise, polymer tantalums offer voltage stability and low ESR. Implementing a division-of-labor strategy—using polymer tantalums for bulk decoupling and MLCCs for point-of-load—optimizes PDN performance and bypasses supply bottlenecks.
Read More Sourcing Silicon Capacitors and MLCCs in the AI Hardware EraUTMEL13 August 2026573
Modern AI hardware requires a hybrid Power Delivery Network (PDN) to maintain low-voltage stability under extreme transient currents. Deep Trench Silicon Capacitors (DTCs) integrate directly into advanced packages to deliver ultra-low ESL and stable performance for high-frequency transient suppression. Meanwhile, Multilayer Ceramic Capacitors (MLCCs) provide essential bulk energy storage on the motherboard, making both technologies complementary across the AI power stack.
Read More MLCC DC Bias Derating: How to Calculate and Compare Effective Capacitance Before Component SelectionUTMEL11 September 2026457
Class II ceramic capacitors suffer significant capacitance loss under DC voltage due to ferroelectric domain saturation and high electric field intensity. This comprehensive engineering guide explains how to calculate true worst-case effective capacitance by compounding DC bias, temperature, tolerance, and aging. It provides multi-vendor simulation workflows, benchtop impedance measurement techniques, and practical guidelines to maintain power supply stability and avoid costly design failures.
Read More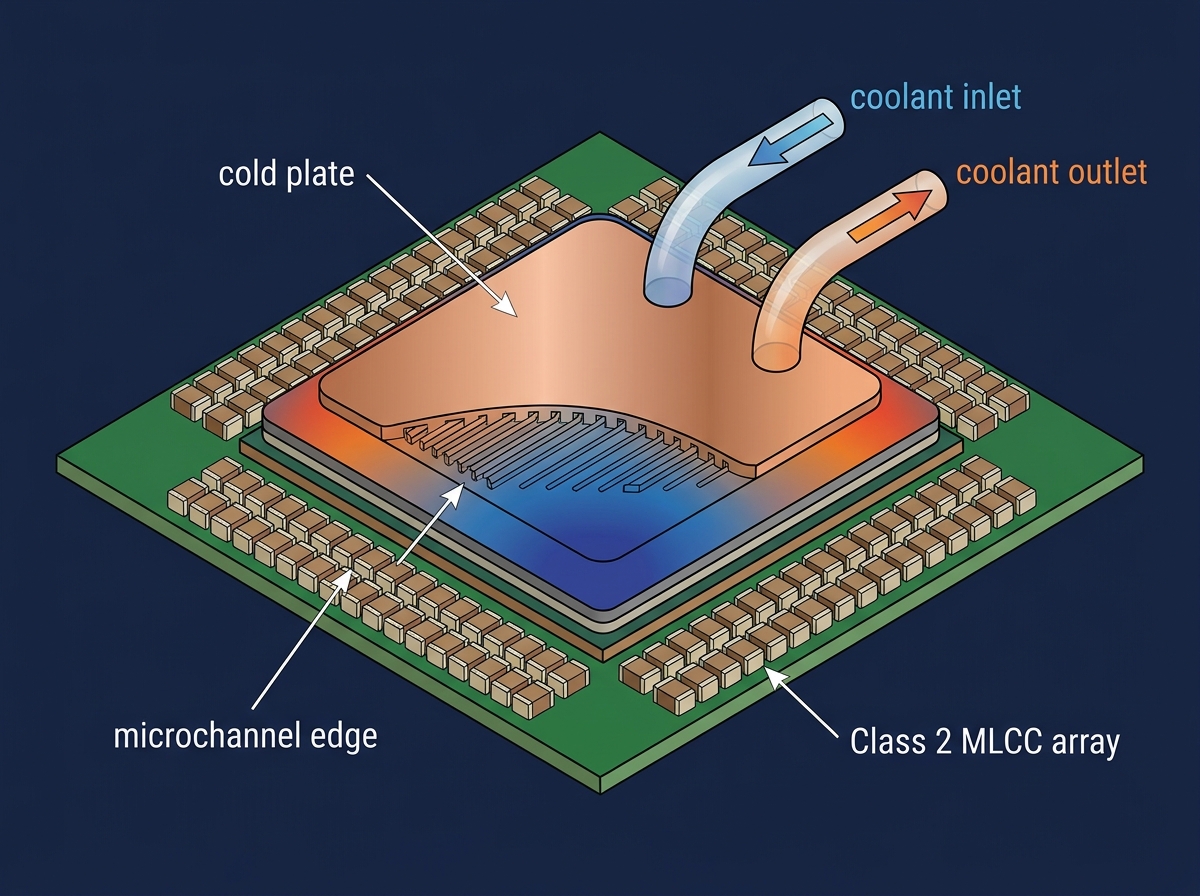 Thermal Management in AI Servers: Specifying Class 2 MLCCs (X7R/X7S) for Liquid Cooling EnvironmentsUTMEL13 July 2026358
Explore how the transition from traditional air-cooling to liquid cooling (direct-to-chip and immersion) in high-density AI server racks alters component thermal profiles. Focus on why design engineers are increasingly specifying Class 2 MLCCs (X7R and X7S dielectrics) over standard X5R variants to prevent thermal degradation near the liquid cooling microchannels. Explain how these capacitors mitigate acoustic noise and voltage bias degradation under heavy workloads. Provide sourcing advice for high-reliability passives via UTMEL during this high-demand memory and passive component super-cycle.
Read More
Subscribe to Utmel !
![FBP-AVR-DB-ISO26262]() FBP-AVR-DB-ISO26262
FBP-AVR-DB-ISO26262Microchip Technology
![EVAL-ADUM4166EBZ]() EVAL-ADUM4166EBZ
EVAL-ADUM4166EBZAnalog Devices Inc.
![EBK-GS12150-00]() EBK-GS12150-00
EBK-GS12150-00Semtech Corporation
![5397]() 5397
5397Adafruit Industries LLC
![EV08L38A]() EV08L38A
EV08L38AMicrochip Technology
![LCD-19251]() LCD-19251
LCD-19251SparkFun Electronics
![UWP-LICENCE-M50A]() UWP-LICENCE-M50A
UWP-LICENCE-M50ACarlo Gavazzi Inc.
![DC3092A]() DC3092A
DC3092AAnalog Devices Inc.
![SPX-18976]() SPX-18976
SPX-18976SparkFun Electronics
![STEVAL-ILL090V1]() STEVAL-ILL090V1
STEVAL-ILL090V1STMicroelectronics
