
 Product
 Brand
Brand Articles
 Tools
Tools
Arduino Micro microcontroller:Datasheet, Features, Applications[FAQs]

Arduino Micro (With Headers) | A000053
Arduino Micro (With Headers) | A000053 datasheet pdf and Evaluation and Demonstration Boards and Kits product details from Arduino stock available at Utmel


The Arduino Micro is a microcontroller development board designed around the ATmega32u4 chip and intended for projects requiring a very compact form factor.

Arduino Micro Quick Look
Arduino Micro overview

The Arduino Micro is a microcontroller development board designed around the ATmega32u4 chip and intended for projects requiring a very compact form factor. It represents Arduino's efforts to produce a minimalist board optimized for integration into small spaces.
At the core of the Micro is an 8-bit ATmega32u4 AVR RISC processor running at 16MHz and featuring 32KB of flash memory, 2.5KB of SRAM, and 1KB of EEPROM. The chip provides native USB functionality, eliminating the need for external USB communication chips. This allows the Micro to appear as a serial port to a connected computer as well as function as a mouse/keyboard.
Technical specifications of the ATmega32u4 microcontroller:
| Specification | Value |
|---|---|
| Microcontroller Type | 8-bit AVR |
| Flash Memory | 32 KB |
| SRAM | 2.5 KB |
| EEPROM | 1 KB |
| Operating Voltage | 2.7 to 5.5V |
| Operating Frequency | 16 MHz |
| Operating Temperature | -40 to 85 C |
| UART Ports | 1 |
| SPI Peripheral | 4 |
| I2C Pins | 1 |
| Digital I/O Pins | 20 |
| PWM Outputs | 7 |
| Analog Inputs | 12 |
*Please note that these are the general specifications and the actual performance may vary depending on the specific model and usage conditions.
The compact Micro PCB measures just 48mm x 18mm and provides 20 digital I/O pins that can interface with external sensors, motors, lights, or other electronics. 7 of these pins support PWM output for modulation and control applications. There are 12 analog input pins for reading analog voltages. Power can be provided via USB or externally. The compact layout and surface mount components allow the Micro to be embedded into tight spaces or plugged into solderless breadboards.

*As the official partner of Arduino, Utmel provides you with official original Arduino products. Welcome to shop at the page dedicated to Arduino products.
Arduino Micro features
-Microcontroller: ATmega32u4 with built-in USB support
-Operating Voltage: 5V
-Digital I/O Pins: 20
-PWM Pins: 7
-Analog Input Pins: 12
-Flash Memory: 32 KB
-SRAM: 2.5 KB
-EEPROM: 1 KB
-USB 2.0 interface
-Breadboard friendly design
-Surface mount components
Specifications
- TypeParameter
- EU RoHSCompliant
- ECCN (US)EAR99
- HTS8473.30.11.80
- AutomotiveNo
- PPAPNo
- Supported DeviceATmega32u4
- Supported Device TechnologyMicrocontroller
- JTAG SupportNo
- Audio InterfacesNo
- Main Program Memory TypeEEPROM/Flash
- Daughter CardsNo
- Part Status
Parts can have many statuses as they progress through the configuration, analysis, review, and approval stages.
Active - TypeMicro Development Board
- RAM Size
RAM size refers to the amount of random access memory (RAM) available in an electronic component, such as a computer or smartphone. RAM is a type of volatile memory that stores data and instructions that are actively being used by the device's processor. The RAM size is typically measured in gigabytes (GB) and determines how much data the device can store and access quickly for processing. A larger RAM size allows for smoother multitasking, faster loading times, and better overall performance of the electronic component. It is an important factor to consider when choosing a device, especially for tasks that require a lot of memory, such as gaming, video editing, or running multiple applications simultaneously.
2.5KB - Program Memory Type
Program memory typically refers to flash memory when it is used to hold the program (instructions). Program memory may also refer to a hard drive or solid state drive (SSD). Contrast with data memory.
EEPROM/Flash - Program Memory Size
Program Memory Size refers to the amount of memory available in an electronic component, such as a microcontroller or microprocessor, that is used to store program instructions. This memory is non-volatile, meaning that the data stored in it is retained even when the power is turned off. The program memory size determines the maximum amount of code that can be stored and executed by the electronic component. It is an important parameter to consider when selecting a component for a specific application, as insufficient program memory size may limit the functionality or performance of the device.
1KB/32KB - USB
USB stands for Universal Serial Bus, which is a common interface used for connecting various electronic devices to a computer or other host device. It allows for the transfer of data, power, and communication between devices. USB ports are found on a wide range of devices such as computers, smartphones, printers, cameras, and more. The USB standard has evolved over the years to include different versions with varying data transfer speeds and power delivery capabilities. Overall, USB has become a widely adopted and versatile standard for connecting and interacting with electronic components.
1 - GPIO
GPIO stands for General Purpose Input/Output. It is a type of electronic pin found on microcontrollers, microprocessors, and other integrated circuits that can be configured to either input or output digital signals. GPIO pins can be used to connect and communicate with external devices such as sensors, LEDs, motors, and more. They provide a flexible way to interact with the physical world by allowing the device to both receive and send digital signals. GPIO pins can be programmed and controlled by software to perform various functions based on the specific requirements of the electronic system.
20
Arduino Micro applications
-Wearable electronics projects
-Small robotics and IoT devices
-Miniaturized sensing systems
-Compact game controllers and HID devices
-Educational and prototyping uses
-Projects requiring breadboard compatibility
-Any application where a compact Arduino is needed
Arduino Micro pinout diagram

Arduino Micro related boards
Arduino Micro vs. Arduino Leonardo
| Specification | Arduino Micro | Arduino Leonardo |
|---|---|---|
| Microcontroller | ATmega32U4 | ATmega32U4 |
| Operating Voltage | 5V | 5V |
| Input Voltage (recommended) | - | 7-12V |
| Digital I/O Pins | 20 | 20 |
| PWM Channels | 7 | 7 |
| Analog Input Channels | 12 | 12 |
| DC Current per I/O Pin | - | 40 mA |
| DC Current for 3.3V Pin | - | 50 mA |
| Flash Memory | 32 KB (ATmega32U4) of which 4 KB used by the bootloader | 32 KB (ATmega32U4) of which 4 KB used by the bootloader |
| SRAM | 2.5 KB (ATmega32U4) | 2.5 KB (ATmega32U4) |
| EEPROM | 1 KB | 1 KB |
| Clock Speed | 16 MHz | 16 MHz |
*Please note that these are the general specifications and the actual performance may vary depending on the specific model and usage conditions.
Arduino Micro alternatives
Arduino Nano: This board is similar to the Arduino Micro in terms of capabilities but is in a smaller package. It is often used in breadboard projects due to its small footprint.
Arduino Uno: This is the most common Arduino board and is a great alternative if you don't need the compact size of the Arduino Micro.
Raspberry Pi Zero: Although not an Arduino, the Raspberry Pi Zero is a tiny, low-cost computer that can be used for a huge range of tasks.
Adafruit Feather 32u4 Basic Proto: This is an Arduino-compatible development board from Adafruit that has a built-in USB and battery charging.
Teensy LC: This board is similar to the Arduino Micro and is also compatible with the Arduino IDE. It offers a slightly different set of features and capabilities.
SparkFun Pro Micro: This board is very similar to the Arduino Micro but is smaller and less expensive.
Arduino Micro project
Password-Protected Door Lock System with Arduino and keypad
We will create a password-protected door lock system using Arduino and a keypad. As security concerns rise due to increasing theft rates, a digital code lock can provide an effective solution for your home or locker. The system will only unlock the door when the correct password is entered.
The project's circuit is straightforward, consisting of an Arduino, keypad module, buzzer, Servo Motor, and LCD. The Arduino controls all processes, including receiving the password from the keypad module, comparing passwords, operating the buzzer, rotating the servo motor, and displaying the status on the LCD.
The keypad is used for inputting the password, the buzzer provides indications, the servo motor opens the gate through rotation, and the LCD displays status messages or notifications.

Required Components:
Here is a list of the components required for this project:
1. Arduino Board
2. 4x3 Keypad
3. 16x2 LCD Display
4. 10K Potentiometer
5. SG90 Servo Motor
6. 5V Buzzer
7. Connecting Wires
8. Breadboard
Circuit Diagram & Connections:
The schematic for the Password-Based Door Lock Security System is quite simple. The 4x3 keypad is connected to the Arduino using digital pins D1 to D7. The servo motor's PWM pin is connected to the Arduino's D9 digital pin. The positive wire of the buzzer is connected to the Arduino's D10 pin, and the negative wire is connected to the ground.
The 16x2 LCD is also connected to the Arduino as follows:
1. Connect pins 1,3,5,16 of LCD to GND.
2. Connect pins 2,15 of LCD to VCC (5V).
3. Connect pin 4 of LCD to pin A0 of Arduino.
4. Connect pin 6 of LCD to pin A1 of Arduino.
5. Connect pin 11 of LCD to pin A2 of Arduino.
6. Connect pin 12 of LCD to pin A3 of Arduino.
7. Connect pin 13 of LCD to pin A4 of Arduino.
8. Connect pin 14 of LCD to pin A5 of Arduino.
Working of Password-Based Door Lock Security System:
The default password "4567" is stored in the Arduino. You can change this in the code. When a password is entered, it is compared with the stored password in the Arduino. If it matches, the LCD displays 'Access Granted, Welcome' and the servo motor rotates 180 degrees to open the door. The door remains open for 5 seconds before automatically locking again.
If the entered password is incorrect, the LCD displays 'Code Incorrect, Go Away', and the buzzer beeps once when any key is pressed.
Sample Code
#include <Keypad.h>
#include <Servo.h>
#include <LiquidCrystal.h>
const int servoPin = 9;
Servo lockServo;
const String password = "4567";
String input;
const byte ROW_NUM = 4;
const byte COL_NUM = 4;
char keys[ROW_NUM][COL_NUM] = {
  {'1','2','3'},
  {'4','5','6'},
  {'7','8','9'},
  {'*','0','#'}
};
byte pin_rows[ROW_NUM] = {9, 8, 7, 6};
byte pin_column[COL_NUM] = {5, 4, 3, 2};
Keypad keypad = Keypad(makeKeymap(keys), pin_rows, pin_column, ROW_NUM, COL_NUM);
LiquidCrystal lcd(A0, A1, A2, A3, A4, A5);
void setup(){
  lockServo.attach(servoPin);
  lockServo.write(0); // Lock
  lcd.begin(16, 2);
}
void loop(){
  char key = keypad.getKey();
  if (key){
    if (key == '#'){
      if (input == password){
        lcd.clear();
        lcd.print("Access Granted");
        lockServo.write(180); // Unlock
        delay(5000);
        lockServo.write(0); // Lock after 5 seconds
      }else{
        lcd.clear();
        lcd.print("Code Incorrect");
      }
      input = ""; // Clear input
    }else{
      input += key;
    }
  }
}
Source Code
The code for the Password-Based Door Lock Security System Using Arduino & Keypad can be found in the Keypad.h library and the original post. It can be copied, pasted, compiled, and uploaded to the ATmega328 microcontroller using the Arduino IDE.
Arduino Micro documents
EAGLE FILES IN .ZIP SCHEMATICS IN .PDF BOARD SIZE IN .DXF FRITZING IN .FZPZ
Tutorials:
Arduino’s official tutorials: This includes step-by-step instructions to get you started with Arduino, built-in examples, and tutorials on a number of libraries that come installed with the IDE.
Introduction to Arduino Micro: This tutorial discusses everything related to the Arduino Micro board including its main features, pinout, pin description, the software used, and applications.
Arduino Tutorial - Online Tutorials Library: This tutorial is intended for enthusiastic students or hobbyists. With Arduino, one can get to know the basics of microcontrollers and sensors very quickly and can start building prototypes with very little investment.
Projects:
The 25 Most Useful Arduino Projects in 2023: This article provides a list of useful projects you can do with a microcontroller.
100 Best Arduino Projects for Beginners to Advance in 2023: This list is divided into 3 levels: Level 1 for beginners who are just starting their Arduino journey, and Level 2 for intermediate projects for those who have mastered all the basics of Arduino and Electronics.
14 Great Arduino Projects for Beginners: This includes projects like an Arduino Lie Detector, an Arduino-Controlled RGB LED Infinity Mirror, a Neopixel Facemask Using Arduino, and more.
Resources:
Micro | Arduino Documentation: This is the official documentation for the Arduino Micro. It provides an overview of the board, its main features, setup guide, suggested libraries, built-in examples, language references, and more.
micro-ROS for Arduino - GitHub: This is a micro-ROS library for Arduino available on GitHub.
What is the main difference between the Micro and the Arduino Leonardo?
The Micro has a smaller physical PCB layout optimized for compact applications. The Leonardo is larger.
Does the Micro work with Arduino shields?
Most shields designed for the Arduino Uno will not work due to the smaller physical size and pin layout. Shields designed for the Leonardo may be compatible.
How much flash memory and RAM does the Micro have?
It has 32KB of flash memory for storing code and 2.5KB of RAM for variables.
How many analog inputs are on the Arduino Micro?
There are 12 analog input pins labeled A0 through A11 than can read analog voltages.
How do you connect the Micro to a computer?
Use a micro USB cable, the same kind used by many phones and cameras. This provides USB communication and power.
 STM32G030K6T6 Microcontrollers: Features, Applications and Datasheet
20 December 20233686
 ACS712 Current Sensor: Pinout, Datasheet and Circuit
09 July 202124940
 TM1618 LED Driver--feature, datasheet, and circuit
02 March 20224165
 TLV320AIC3104IRHBR Audio Codec: Pinout, Datasheet, and Alternatives
25 March 20222201
 S3K DIODE GEN PURP 800V 3A SMC: S3K Marking Information, Key parameters and Applications
10 January 2022729
 STM32F429ZIT6 for Industrial Automation: Complete Guide 2025
24 July 2025286
 Renesas DF2268FA20V Technical Datasheet: Features, Applications, and Reference Designs
29 February 2024135
 STPS20H100CT Microcontroller: 72MHz, 48-LQFP, Pinout and Datasheet
12 February 20223131
 The Understanding to Autonomous Driving Sensor
10 November 20211360
 The Introduction to USB Type-C Pin Signal and PCB Layout
03 December 202127071
 Near Field Communication (NFC) Explained: Working and Applications
24 May 202114378
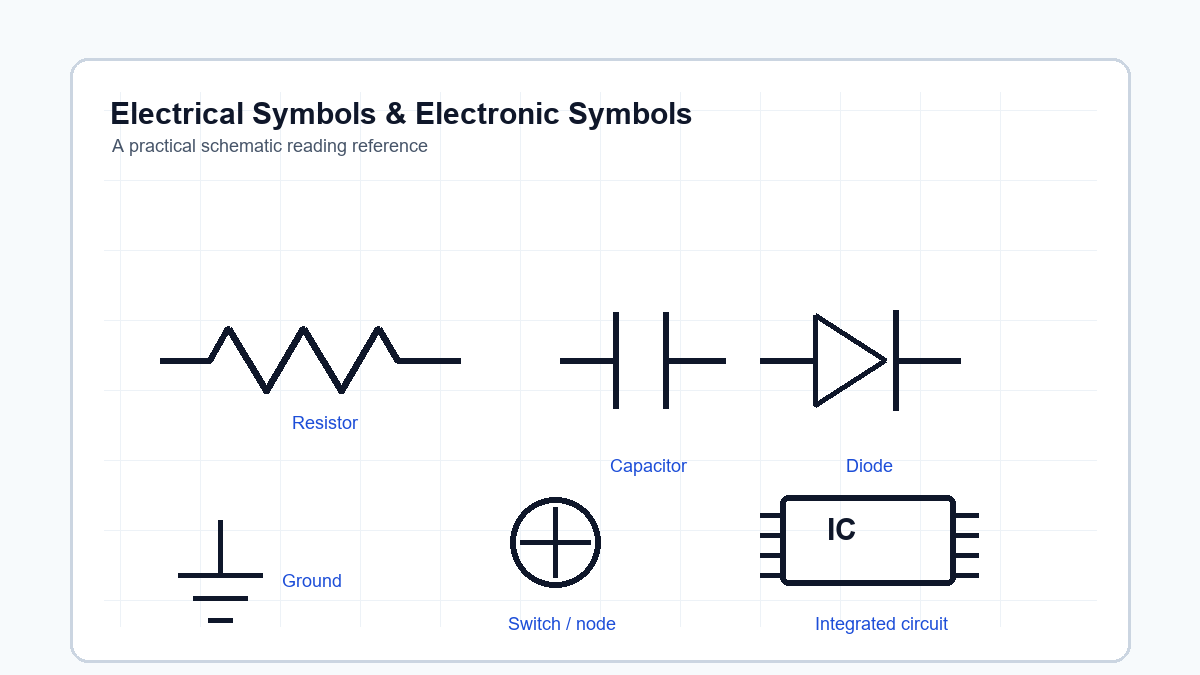 Electrical Symbols & Electronic Symbols: A Practical Guide to Reading Circuit Diagrams
17 June 2026298
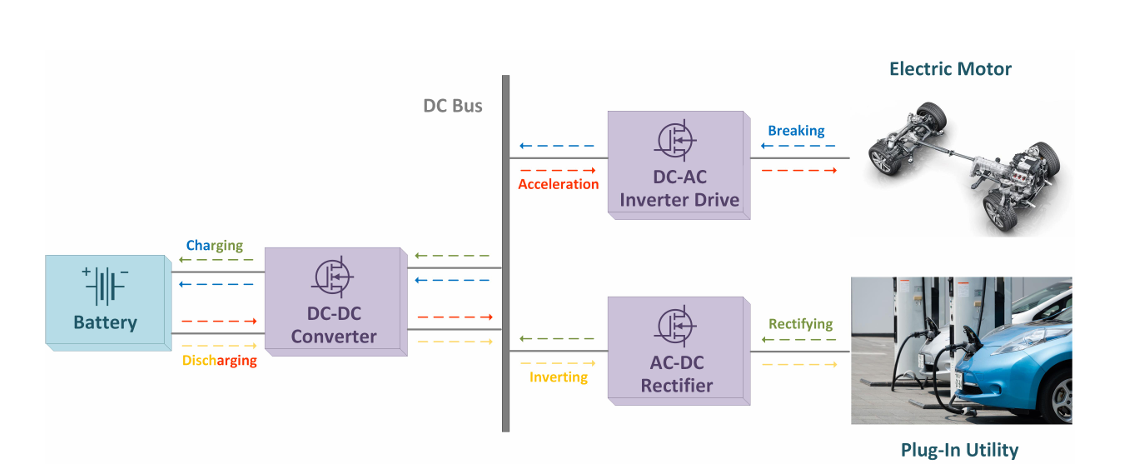 A Hybrid SiC and GaN-Based DC-DC Converter for EVs
20 September 20242919
 Increasing the Efficiency through Wide-Bandgap Semiconductors (SiC & GaN)
24 October 20222546
 Power Management Integrated Circuit (PMIC) Guide
10 February 202214479
 Analysis of Wide Bandgap Devices in Renewable Energy Systems
11 April 20235169
Arduino
In Stock
United States
China
Canada
Japan
Russia
Germany
United Kingdom
Singapore
Italy
Hong Kong(China)
Taiwan(China)
France
Korea
Mexico
Netherlands
Malaysia
Austria
Spain
Switzerland
Poland
Thailand
Vietnam
India
United Arab Emirates
Afghanistan
Åland Islands
Albania
Algeria
American Samoa
Andorra
Angola
Anguilla
Antigua & Barbuda
Argentina
Armenia
Aruba
Australia
Azerbaijan
Bahamas
Bahrain
Bangladesh
Barbados
Belarus
Belgium
Belize
Benin
Bermuda
Bhutan
Bolivia
Bonaire, Sint Eustatius and Saba
Bosnia & Herzegovina
Botswana
Brazil
British Indian Ocean Territory
British Virgin Islands
Brunei
Bulgaria
Burkina Faso
Burundi
Cabo Verde
Cambodia
Cameroon
Cayman Islands
Central African Republic
Chad
Chile
Christmas Island
Cocos (Keeling) Islands
Colombia
Comoros
Congo
Congo (DRC)
Cook Islands
Costa Rica
Côte d’Ivoire
Croatia
Cuba
Curaçao
Cyprus
Czechia
Denmark
Djibouti
Dominica
Dominican Republic
Ecuador
Egypt
El Salvador
Equatorial Guinea
Eritrea
Estonia
Eswatini
Ethiopia
Falkland Islands
Faroe Islands
Fiji
Finland
French Guiana
French Polynesia
Gabon
Gambia
Georgia
Ghana
Gibraltar
Greece
Greenland
Grenada
Guadeloupe
Guam
Guatemala
Guernsey
Guinea
Guinea-Bissau
Guyana
Haiti
Honduras
Hungary
Iceland
Indonesia
Iran
Iraq
Ireland
Isle of Man
Israel
Jamaica
Jersey
Jordan
Kazakhstan
Kenya
Kiribati
Kosovo
Kuwait
Kyrgyzstan
Laos
Latvia
Lebanon
Lesotho
Liberia
Libya
Liechtenstein
Lithuania
Luxembourg
Macao(China)
Madagascar
Malawi
Maldives
Mali
Malta
Marshall Islands
Martinique
Mauritania
Mauritius
Mayotte
Micronesia
Moldova
Monaco
Mongolia
Montenegro
Montserrat
Morocco
Mozambique
Myanmar
Namibia
Nauru
Nepal
New Caledonia
New Zealand
Nicaragua
Niger
Nigeria
Niue
Norfolk Island
North Korea
North Macedonia
Northern Mariana Islands
Norway
Oman
Pakistan
Palau
Palestinian Authority
Panama
Papua New Guinea
Paraguay
Peru
Philippines
Pitcairn Islands
Portugal
Puerto Rico
Qatar
Réunion
Romania
Rwanda
Samoa
San Marino
São Tomé & Príncipe
Saudi Arabia
Senegal
Serbia
Seychelles
Sierra Leone
Sint Maarten
Slovakia
Slovenia
Solomon Islands
Somalia
South Africa
South Sudan
Sri Lanka
St Helena, Ascension, Tristan da Cunha
St. Barthélemy
St. Kitts & Nevis
St. Lucia
St. Martin
St. Pierre & Miquelon
St. Vincent & Grenadines
Sudan
Suriname
Svalbard & Jan Mayen
Sweden
Syria
Tajikistan
Tanzania
Timor-Leste
Togo
Tokelau
Tonga
Trinidad & Tobago
Tunisia
Turkey
Turkmenistan
Turks & Caicos Islands
Tuvalu
U.S. Outlying Islands
U.S. Virgin Islands
Uganda
Ukraine
Uruguay
Uzbekistan
Vanuatu
Vatican City
Venezuela
Wallis & Futuna
Yemen
Zambia
Zimbabwe
![C000167]() C000167
C000167Arduino
![ARDUINO NANO 3.0]() ARDUINO NANO 3.0
ARDUINO NANO 3.0Arduino
![Arduino Zero | ABX00003]() Arduino Zero | ABX00003
Arduino Zero | ABX00003Arduino
![ARDUINO MEGA 2560 REV3]() ARDUINO MEGA 2560 REV3
ARDUINO MEGA 2560 REV3Arduino
![Arduino MKR GSM 1400 | ABX00018]()
![Starter Kit - Italiano | K010007]()
![Arduino Nano | A000005]() Arduino Nano | A000005
Arduino Nano | A000005Arduino
![ABX00012 | Arduino MKR ZERO]() ABX00012 | Arduino MKR ZERO
ABX00012 | Arduino MKR ZEROArduino
![Arduino CTC 101 Program - Full | AKX00002]()
![A000067 | Arduino Mega 2560 Rev3]()
