

 Product
 Brand
Brand Articles
 Tools
Tools
How Zener Diodes Work: Characteristics and Selection Guide
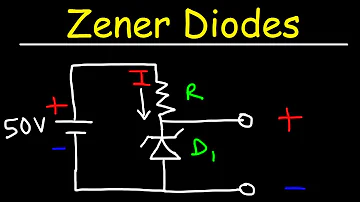
Zener Diodes
A Zener diode looks like an ordinary small-signal diode, yet it earns its place in a design by doing something an ordinary diode is not built to do: it operates deliberately in reverse breakdown and holds a roughly steady voltage across itself even as the current through it swings up and down. That single behaviour is the foundation of the simplest voltage regulators, many on-board voltage references, and a whole family of clamping and protection tricks. This article walks through the breakdown mechanism, the characteristics that matter on a datasheet, and a practical way to pick and size a Zener for a real rail.
Because Zener behaviour is so number-heavy in practice, the discussion here stays qualitative on purpose. Treat every exact figure for Zener voltage, dynamic impedance, tolerance, power, and temperature coefficient as something to read from the manufacturer datasheet of the specific part you intend to use, not as a value to memorise from a tutorial.
What Makes a Zener Diode Different
An ordinary rectifier diode conducts in the forward direction and is expected to block in reverse until it is destroyed. A Zener diode is designed and characterised for the reverse region instead. When you raise the reverse voltage to its rated breakdown point, the device begins to conduct in reverse in a controlled, repeatable, and non-destructive way, and the voltage across it stays close to its rated value over a wide range of current.
That stability is the whole point. As long as the current stays inside the device's working window, large changes in current produce only small changes in voltage. A designer exploits this by forcing current through the diode in reverse with a series element and reading the resulting near-constant voltage as a regulated node or a reference point. The forward direction still behaves like a normal diode, so in most Zener circuits the forward characteristic is simply not the part you are using.
The trade-off is that this "constant" voltage is only approximately constant. It drifts a little with current, it drifts with temperature, and it carries a manufacturing tolerance. Understanding those imperfections is what separates a Zener circuit that survives production from one that only works on the bench.
Zener vs Avalanche Breakdown
Reverse breakdown in these devices comes from two distinct physical mechanisms, and most real parts are dominated by one or the other depending on their rated voltage. The Zener mechanism is a field effect inside a heavily doped, very thin junction; the avalanche mechanism is a carrier-multiplication effect that takes over in lightly doped junctions at higher reverse voltages. Lower-voltage devices lean on the Zener effect, higher-voltage devices lean on avalanche, and there is a crossover band where both contribute.
The practical reason this matters is temperature behaviour, because the two mechanisms move in opposite directions. The Zener mechanism tends to make the breakdown voltage fall as temperature rises, while the avalanche mechanism tends to make it rise. Near the crossover band the two tendencies can partly cancel, which is why parts in that region are often the most thermally stable. If your design must hold its voltage across a wide temperature range, the dominant mechanism of the part you choose is a real selection input, not a footnote.
| Aspect | Zener mechanism | Avalanche mechanism |
|---|---|---|
| Junction style | Heavily doped, very narrow | Lightly doped, wider |
| Dominant region | Lower rated breakdown voltages | Higher rated breakdown voltages |
| Temperature trend of breakdown voltage | Tends to decrease as temperature rises | Tends to increase as temperature rises |
| Selection consequence | Better thermal stability is often found near the crossover band where the two effects oppose each other | |
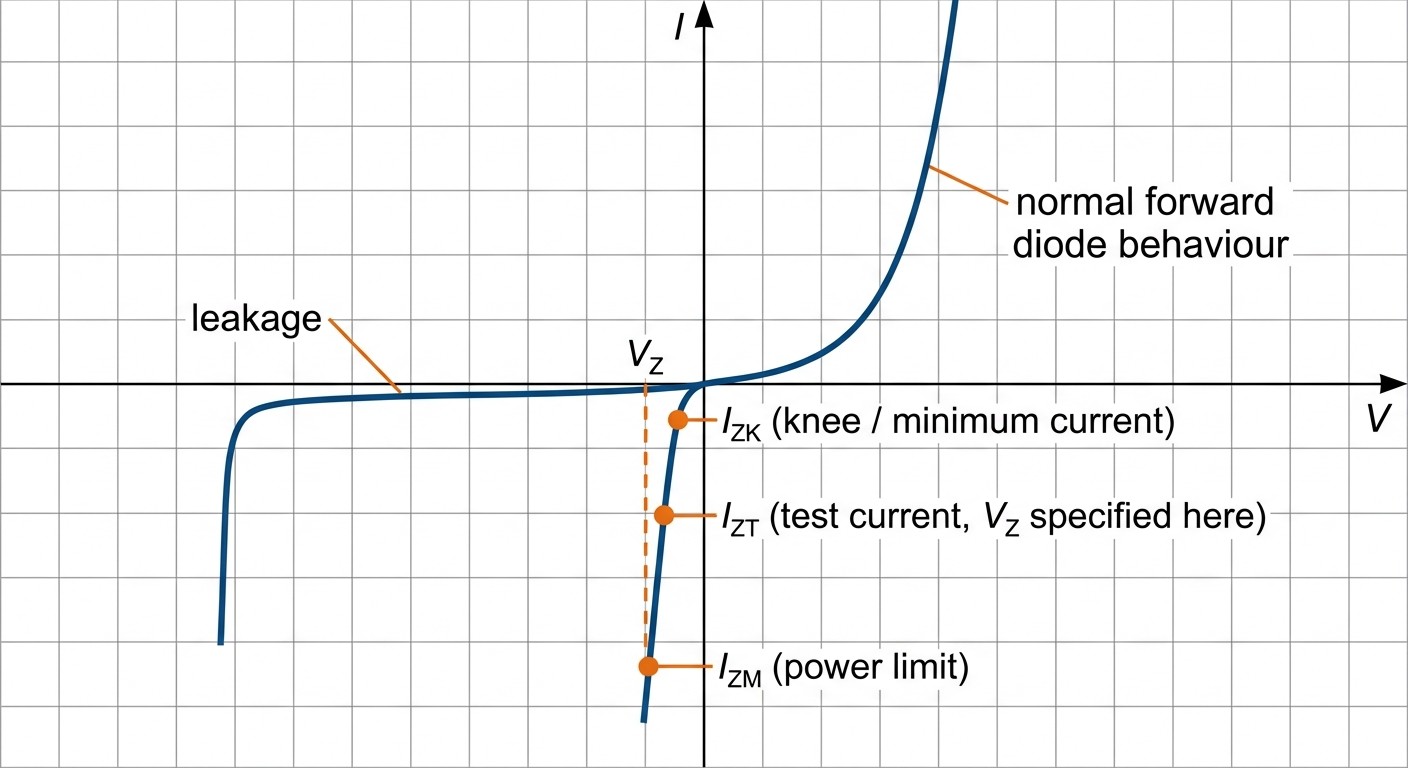
Figure 1: The two reverse-breakdown mechanisms compared. The Zener effect dominates in heavily doped, narrow junctions at lower voltages with a negative temperature coefficient, while avalanche multiplication dominates at higher voltages with a positive coefficient; the crossover band offers the best thermal stability.
Datasheets rarely force you to name the mechanism directly. Instead they hand you a temperature-coefficient figure that already captures it, so the working takeaway is to read that coefficient rather than assume a sign from the device's voltage alone.
The IV Characteristic and Key Parameters
The reverse part of a Zener's current-voltage curve is steep: once breakdown begins, the voltage barely moves while the current climbs. That steepness is exactly what you want, and the datasheet quantifies how steep it really is through a handful of parameters that deserve to be read together rather than in isolation.
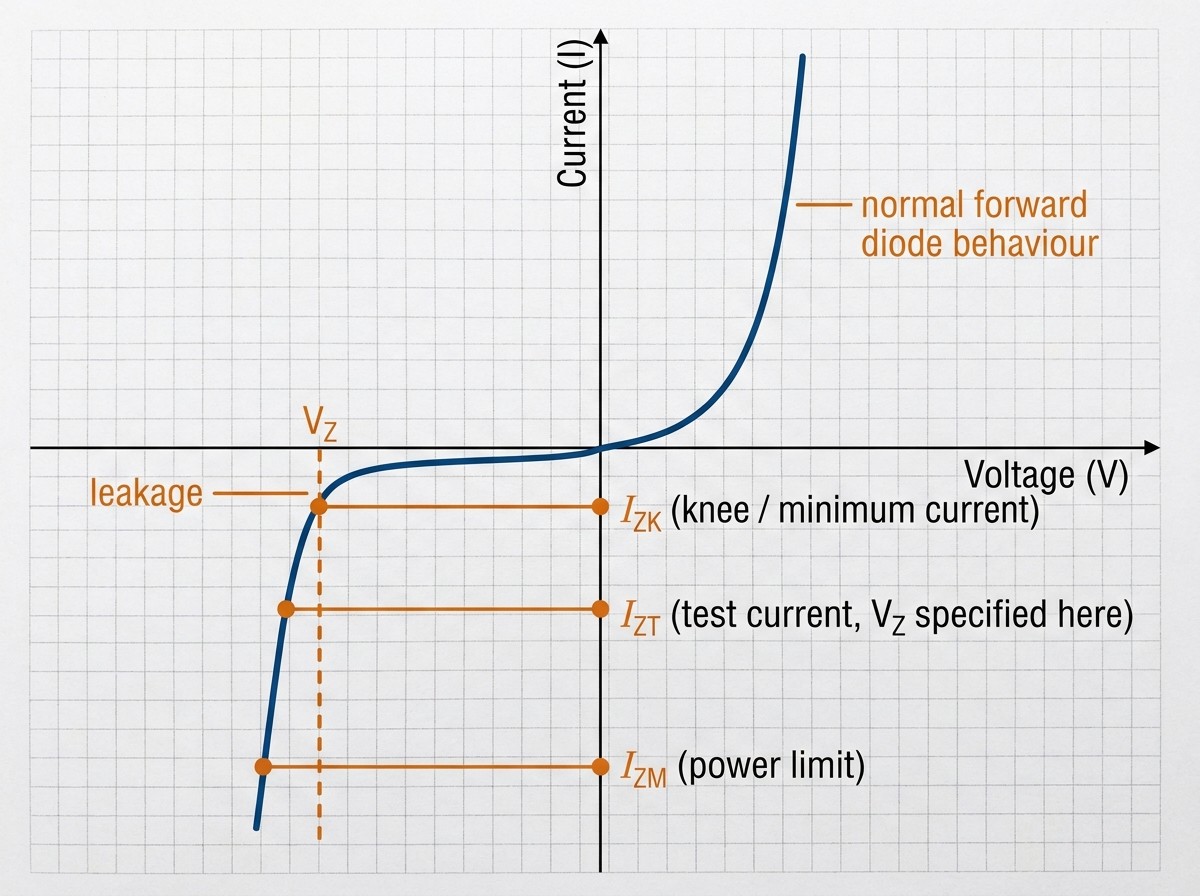
Figure 2: A typical Zener diode IV characteristic. The forward direction behaves like a normal diode, while the reverse curve stays near zero current until the breakdown knee, then turns sharply vertical. The steep region between the minimum operating current and the power-limited maximum is where regulation happens.
Zener voltage is the nominal breakdown voltage, normally specified at a stated test current. The figure on the front page is only meaningful alongside the current at which it was measured.
Dynamic (or differential) impedance describes how much the voltage shifts for a change in current. A lower value means a flatter, more regulator-like characteristic; it is usually worse near the minimum-current end of the curve.
Tolerance is the manufacturing spread of the Zener voltage. Two parts with the same nominal voltage can sit at different points within that band, which matters whenever a downstream circuit assumes a precise level.
Power dissipation is the heat the device can handle, and it scales with how it is mounted and cooled. Reverse voltage multiplied by reverse current is dissipated in the diode, so power is the parameter that quietly sets the safe upper current.
Temperature coefficient captures how the Zener voltage moves with temperature, carrying the sign discussed in the breakdown section.
| Parameter | What it describes | Why it shapes a design |
|---|---|---|
| Zener voltage | Nominal regulated/reference level | Sets the target rail or clamp point |
| Test current | Current at which the voltage is specified | The voltage figure is only valid near this point |
| Dynamic impedance | Voltage change per current change | Predicts regulation quality and ripple rejection |
| Tolerance | Spread around the nominal voltage | Limits accuracy without trimming or selection |
| Power rating | Safe dissipation given mounting | Caps the maximum safe reverse current |
| Temperature coefficient | Voltage drift with temperature | Drives stability over the operating range |
No single one of these tells the whole story. A part can have an attractive nominal voltage and still be a poor fit because its impedance is high at the current you can afford, or because its tolerance is too loose for the job.
How a Zener Shunt Regulator Works
The classic Zener regulator is a shunt topology: a series resistor feeds current from the unregulated input into a node, the Zener sits from that node to ground, and the load hangs across the Zener. The series resistor carries the combined current of the diode and the load, while the diode shunts whatever current the load does not take. Because the diode holds a near-constant voltage in breakdown, the node stays near the Zener voltage as the load varies.
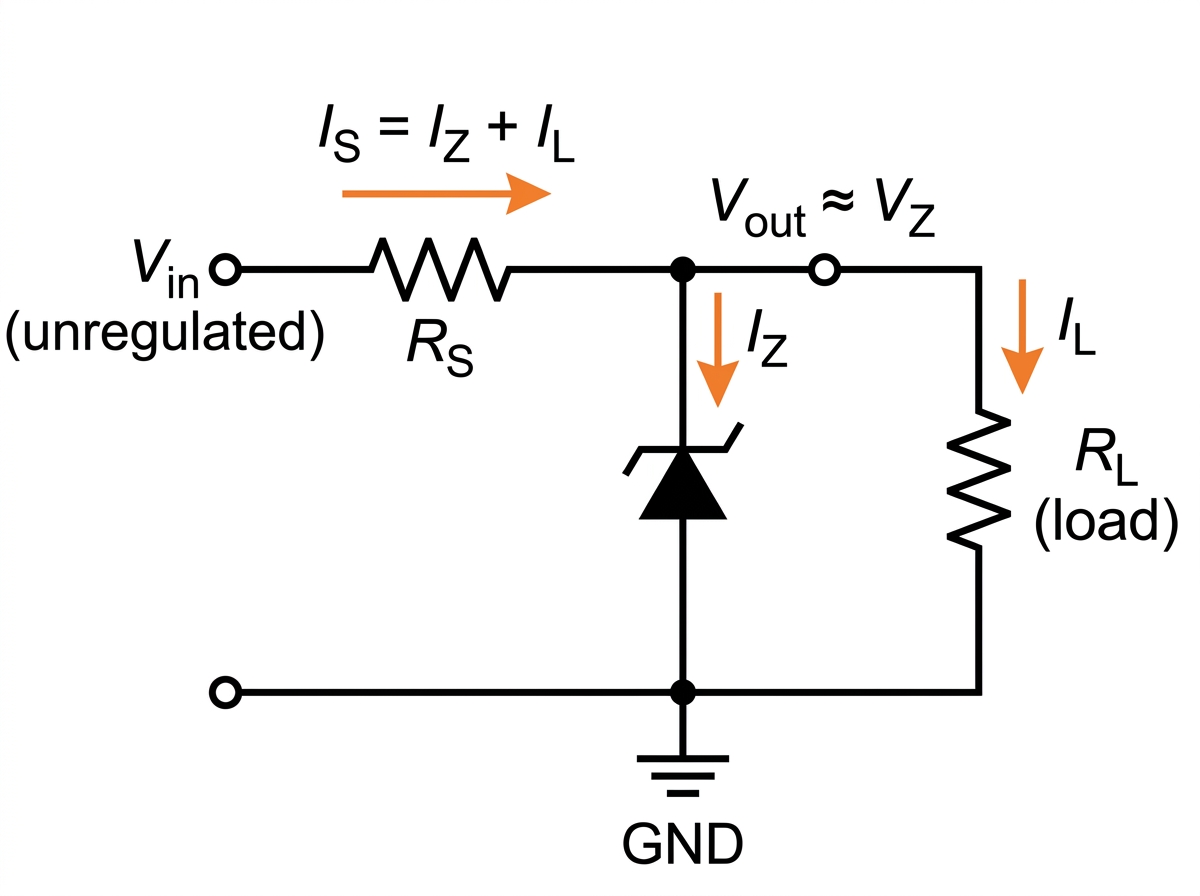
Figure 3: The classic Zener shunt regulator. The series resistor carries the total current from the unregulated input; the Zener shunts whatever the load does not take, holding the output node near its breakdown voltage. Sizing the resistor against the worst-case input and load corners is the heart of the design.
Sizing the series resistor is the heart of the design, and the logic is a balancing act rather than a single formula to copy. The resistor has to be small enough that, at the lowest expected input voltage and the highest load current, enough current still reaches the diode to keep it above its minimum operating current and in regulation. The same resistor has to be large enough that, at the highest input voltage and the lightest load (including no load at all), the current diverted into the diode does not push it past its power rating. The workable range of resistor values is the overlap of those two constraints, and if the overlap is empty the topology cannot meet the requirement as drawn.
Two failure directions follow naturally from that logic. If the resistor is too large, a heavy load starves the diode below its minimum current and the regulation collapses. If the resistor is too small, a light or absent load dumps excess current into the diode and overheats it. A shunt regulator therefore must be checked at the corners of the input-voltage and load-current ranges, never only at the nominal operating point.
Regulator or Reference?
A plain Zener shunt is attractive because it is cheap, small, and needs almost nothing around it, but its accuracy is limited by tolerance, dynamic impedance, and temperature drift. For rough supplies, simple clamps, and undemanding bias rails, that is perfectly adequate. When a circuit needs a stable, accurate, low-drift voltage, a purpose-built shunt or series voltage reference, or a dedicated linear regulator, will outperform a discrete Zener by a wide margin.
The decision usually comes down to how much accuracy and stability the downstream circuit actually demands, how much current it draws and how variable that current is, and how much board area, cost, and quiescent current the budget allows. The table below is a decision aid, not a rule; the right answer is whichever option meets the accuracy requirement at acceptable cost and complexity.
| Need | A simple Zener shunt is reasonable when | A dedicated reference or regulator is the better call when |
|---|---|---|
| Accuracy | Coarse level is acceptable | Tight, repeatable voltage is required |
| Stability over temperature | Mild drift is tolerable | Drift must stay small across the range |
| Load behaviour | Load is light and fairly steady | Load is large, fast-changing, or needs strong regulation |
| Cost and space | Lowest possible parts count matters most | The accuracy justifies extra cost and area |
Selecting a Zener
A reliable selection routine looks at the rail, the power, the current window, and the accuracy together, because optimising one in isolation tends to break another. The following checklist keeps those constraints in view without committing to any specific number.
Match the Zener voltage to the rail you want, remembering that the specified voltage is tied to a test current and that your operating current may sit somewhere else on the curve. Read the value at a current close to where you will actually run the part.
Give yourself power headroom. Work out the worst-case dissipation at the highest input voltage and lightest load, then choose a part and mounting whose rating comfortably exceeds it rather than just meeting it.
Respect the minimum-current margin. Confirm that at the lowest input voltage and heaviest load, the diode still receives enough current to stay in its well-regulated region, well above the knee of the curve.
Check tolerance and temperature. Decide whether the manufacturing spread and temperature drift are acceptable for the downstream circuit, and prefer a part whose temperature coefficient suits your operating range.
Re-evaluate the topology. If no single part satisfies the voltage, power, and accuracy constraints at once, that is a signal to move from a discrete Zener to a dedicated reference or regulator rather than forcing the part.
Run this list at the extremes of every range that matters, not at the typical case, because Zener circuits almost always fail at a corner condition rather than at nominal.
Clamping, Protection, and Common Biasing Mistakes
Beyond steady regulation, a Zener is a natural clamp. Placed across a node, it conducts hard once the voltage tries to exceed its breakdown level, holding the node near that level and absorbing the excess. That makes it useful for limiting the swing on a signal, protecting an input from over-voltage, or capping a transient, provided the device and its surrounding resistance can absorb the energy involved. For genuinely fast or high-energy transients, parts specifically built for transient suppression are designed for that duty, whereas a general-purpose Zener is better suited to slower or lower-energy clamping.
Most Zener problems trace back to a small set of biasing mistakes, and they are easy to design out once named.
| Mistake | What goes wrong | How to avoid it |
|---|---|---|
| Missing or undersized series resistor | Without a current-limiting element the diode sees excessive current and overheats | Always feed the diode through a properly sized series element |
| Operating below minimum current | At heavy load or low input the diode drops out of regulation | Verify the diode stays above its minimum current at the worst-case corner |
| Ignoring the no-load condition | A light or absent load forces all the current into the diode and overheats it | Check dissipation at highest input and lightest load |
| Ignoring temperature coefficient | The clamp or reference level drifts as the board heats up | Read the temperature coefficient and pick a part suited to the range |
| Trusting the nominal voltage exactly | Tolerance and impedance move the real level away from the headline figure | Design for the band, not the single nominal number |
The common thread is that a Zener is only as good as the current source feeding it. Get the series element and the current window right at every corner, and the device behaves predictably; get them wrong, and the same part either stops regulating or cooks.
Frequently Asked Questions
What is a Zener diode actually used for?
It is used as a simple shunt voltage regulator, as a modest on-board voltage reference, and as a clamp or protection element that limits a node to roughly its breakdown voltage. Each role relies on the same property: a near-constant voltage in reverse breakdown.
How is a Zener different from a normal diode?
A normal rectifier diode is meant to block in reverse until it fails, whereas a Zener is designed and characterised to operate in reverse breakdown safely and repeatably. The forward behaviour is similar, but Zener circuits almost always use the reverse region.
What happens when a Zener diode fails?
Failure usually follows from too much power, so the practical defence is staying inside the rated dissipation with margin. The exact failure mode and limits belong to the specific part, so confirm them against that device's datasheet rather than assuming a general outcome.
How do I size the power rating?
Find the worst-case dissipation, which occurs at the highest input voltage and the lightest or absent load, then choose a part and mounting whose rated dissipation comfortably exceeds that figure. The actual numbers come from the datasheet and your circuit conditions, not from a fixed rule of thumb.
How do I choose the Zener voltage?
Pick the nominal voltage that matches the rail or clamp level you want, then confirm that value is specified near the current you will run, and check that the tolerance and temperature drift are acceptable for the downstream circuit. If precision matters more than simplicity, consider a dedicated reference instead.
Is a plain Zener enough on its own, or do I need a dedicated regulator?
For coarse, low-current, undemanding rails a simple Zener shunt can be enough, but for accurate, stable, or higher-current supplies a dedicated reference or linear regulator is the right tool. The choice depends on the accuracy and load the circuit truly needs.
Sources and References
onsemi, "Zener Theory and Design Considerations" handbook is a strong grounding for breakdown mechanisms, the meaning of dynamic impedance and temperature coefficient, and shunt-regulator design logic; it reflects one manufacturer's parts and conventions, so confirm any specific figure against the datasheet of the device you actually use.
Vishay Zener diode product and documentation portal is useful for seeing how Zener voltage, tolerance, and power ratings are organised across a real catalogue; because it is a catalogue rather than a tutorial, treat it as a way to read parameters in context rather than as an explanation of the underlying physics.
Texas Instruments voltage reference overview and application notes are helpful for understanding when a dedicated reference outperforms a discrete Zener and how accuracy and drift are specified; the material naturally favours integrated references, so weigh that perspective when deciding between a Zener and a purpose-built part.
Nexperia Zener diode portfolio and documentation gives a second manufacturer's view of how these parameters are presented and grouped; like any single vendor source, it documents its own range, so cross-check the exact device before committing to a value.
Diodes Incorporated Zener diode product family is a practical reference for the breadth of voltages and power classes available and how they are described; it is a product listing rather than a design guide, so pair it with a theory source when you need the reasoning behind a parameter.
 UTMEL
UTMEL
We are the professional distributor of electronic components, providing a large variety of products to save you a lot of time, effort, and cost with our efficient self-customized service. careful order preparation fast delivery service
 All You Need to Know About Rectifier CircuitUTMEL24 April 202517953
All You Need to Know About Rectifier Circuit
Read More 15 Key Elements of Diode SelectionUTMEL26 November 202119104
Hello everyone, I am Rose. Welcome back to the new post today. Diodes are one of the most common components in our circuit boards. So, what factors should be considered when selecting models?
Read More What is a PIN Diode?UTMEL04 February 202110457
While diodes with a simple PN junction are by far the most common type of diode in operation, in a variety of applications, other forms of diode may be used. The PIN diode is one type that is used for a number of circuits. In a variety of places, this diode type is used. For RF switching, the PIN diode is very fine, and the PIN structure in photodiodes is very useful as well.
Read More Microwave Diode: Introduction and TypesUTMEL07 January 202126371
Microwave diodes are diodes that work in the microwave frequency band. It is a solid-state microwave device. Microwave band usually refers to the frequency from 300 MHz to 3000 GHz. After the discovery of the point contact diode effect at the end of the 19th century, microwave diodes such as PIN diodes, varactor diodes, and Schottky diode tubes appeared one after another. Microwave diodes have the advantages of small size and high reliability, and are used in microwave oscillation, amplification, frequency conversion, switching, phase shifting and modulation.
Read More What Determines the Maximum Operating Frequency of a Diode?UTMEL29 June 202213236
Hello, wish you a wonderful day. In this essay, we first pose the following query: what determines the diode's maximum operating frequency? In regards to the solution, the first thing we need to understand is that the junction capacitance and the reverse recovery time of the diode are two distinct concepts. The charging and discharging times of the junction capacitance cannot match the reverse recovery time. You say that, why? Let's start by taking a look at these facts.
Read More
Subscribe to Utmel !
![BLM21BB201SN1D]() BLM21BB201SN1D
BLM21BB201SN1DMurata Electronics
![BLM18BD421SN1D]() BLM18BD421SN1D
BLM18BD421SN1DMurata Electronics
![BLM18AG331SH1D]() BLM18AG331SH1D
BLM18AG331SH1DMurata Electronics
![BLM03PG220SN1D]() BLM03PG220SN1D
BLM03PG220SN1DMurata Electronics
![YFF31AH2A104MT0Y0N]() YFF31AH2A104MT0Y0N
YFF31AH2A104MT0Y0NTDK Corporation
![BLM18BB141SN1D]() BLM18BB141SN1D
BLM18BB141SN1DMurata Electronics
![MMZ1608S202ATA00]() MMZ1608S202ATA00
MMZ1608S202ATA00TDK Corporation
![BLM18HK102SN1D]() BLM18HK102SN1D
BLM18HK102SN1DMurata Electronics
![MMZ2012R121AT000]() MMZ2012R121AT000
MMZ2012R121AT000TDK Corporation
![MMZ2012Y102BT000]() MMZ2012Y102BT000
MMZ2012Y102BT000TDK Corporation


